Nine Must-Have Nail-Art Tools For Your Manicure Kit
With the help of self-taught nail artist Amelia Baxter-Stoltzfus, we compiled this list of essential nail-art tools, including everything from dotting tools to nail stencils. Find out what your manicure kit is missing, and learn more about the types of effects you can create on nails at home with them. (After getting your base coat professionally applied at a nail salon, of course. You want to make sure you start off on the right foot—er, hand.)
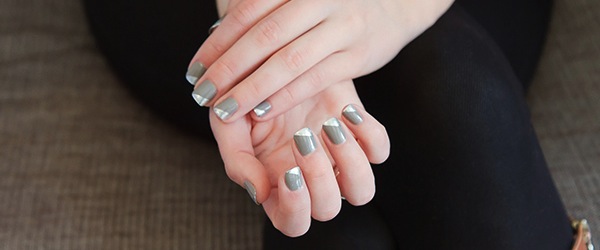
1. Striping and Scotch tapes
What they’re used for: Striping (duh) and color-blocking
How to use them: Striping tape is essential for creating thinner lines of color (shown at right). Wait until your base coat is totally dry, adhere the tape in whatever pattern you’d like, then paint over it with a second color. “Take up the tape while the top color is still wet to prevent peeling,” Amelia said.
For larger blocks of color, though, just use plain-old Scotch tape.
Photo courtesy of The Wow Style via Pinterest
2. Makeup sponges
What they’re used for: Gradients and “galaxy” nails
How to use them: To create ombre-inspired gradients, simply paint multiple colors in parallel, touching lines onto a single sponge. Then, press the sponge onto your nail. Amelia likes this technique because it allows you to build color until it’s as vibrant as you want.
A lighter touch creates an entirely separate effect, however. “Smaller dabs of different colors can give a cool space effect for galaxy nails,” she said. To polish off this look (no pun intended), she suggested incorporating glitter for a starry effect.
Photo courtesy of Instagram user deborahlippmann via Pinterest
3. Bobby pins
What they’re used for: Polka dots
How to use them: “These are straightforward in theory, if not in practice, when trying to keep your non-dominant hand steady,” Amelia admitted. Using as a dotting tool, simply dot polish onto the heads of the bobby pins, then dot the pins onto your nails. Bonus tip: use bobby pins and toothpicks to create dots of varied sizes.
Photo courtesy of Instagram user amnorton1212 via Pinterest
4. Rubbing alcohol
What it’s used for: Newsprint transfers
How to use it: Though it looks impossibly intricate, Amelia said this trick might be the easiest of the bunch. Simply soak a piece of newspaper in alcohol (Amelia has experimented with crossword puzzle answer keys), press it on the nail for 30 seconds, then peel it off creating the appearance of nail art stickers. “Make sure to use a topcoat or the ink will smudge,” she said.
Bookworms might want to try simple blocks of text, whereas pop-art lovers could dip into the funny pages.
Photo courtesy of Beautylish via Pinterest
5. Stamping plates and stampers
What they’re used for: Stamping, of course
How to use them: Unlike the newspaper trick, nail stamping is a bit more complicated. “[These] require more initial investment to get and some experimentation once you have them,” Amelia said. Stamping plates have designs etched into them, and the stamper rolls over the surface of the plates. “Paint a layer of polish over the etch, scrape off the [excess] (I use an old gift card, although you can buy actual scrapers for this purpose), roll the stamper over the etch, and then very quickly roll the stamper onto the nail.”
Here’s a short video of the process, which actually shows the makeup-sponge technique as well:
“It takes some practice, and some polishes are better than others,” Amelia said. “You can buy stamping-specific polishes, but some regular brands stamp well, particularly older, slightly dried-out polishes.” She likes the Bundle Monster stamping sets.
Photo courtesy of Cosmetic Cupcake via Pinterest
6. Nail-art stickers
What they’re used for: To easily apply nail art
How to use them: Nail wraps or nail stickers give you the look of nail art fast. All you have to do is stretch these pliable stickers over your clean and bare nails (skipping the base coat allows the stickers to adhere properly) and they resist chips for up to 10 days. They often have amazing accents, too, like intricate stripes or gold studs.
To learn more, check out what our beauty editor Amelia discovered when comparing two popular brands of nail wraps.
Photo by Andrew Nawrocki, Groupon
7. Nail studs
What they’re used for: 3D nail embellishments
How to use them: Apply two coats of nail polish and let dry. Follow with a topcoat; while the polish is still wet, add nail studs into any eye-catching arrangement of your choice. Finish off with a final layer of topcoat to seal in both the color and nail studs.
Photo courtesy of Blog.Lulus.com
8. Loose glitter
What it’s used for: Adding not-so-subtle sparkles
How to use it: Although creating an accent nail with glitter polish is a popular choice, try using loose glitter to create shimmery tips as a blingy-upgrade to the classic french manicure. All you have to do is paint a thin layer of clear nail polish across the ends of your nails and dip each finger into the glitter. To seal in all the sparkles, make sure to finish off the look with a clear top-coat.
Photo courtesy of Beautylish via Pinterest
9. Cleanup kit
This consists of three items: cotton swabs, petroleum jelly, and top coat. Swabs dipped in acetone or nail-polish remover can erase mistakes, a coat of Vaseline on your cuticles can prevent polish from sticking during messier projects, and a quick-dry topcoat ensures your fingers stay flawless.
Check out related reads on the The Guide:
Modernize Your French-Tip Nails
Three modern twists on french-tip nails give the traditional look a whole new vibe.
9 Nail-Design Ideas for Conservative or Creative Work Environments
We dug through Instagram to find nail art fit for creative professionals and manis that'll appease even the stodgiest boss.
Deals in tulsa

Deals in tulsa Other Deals in tulsa